There are several possibilities to create and maintain your (help) documentation. One of them is using the official Microsoft Help SDK which creates a .chm (compiled HTML) file. Even though the tools are from the ‘dark ages’ (latest release is 3/4/2003), the .chm file format is still used regularly to create documentation, for example by SandCastle. An extra reason why it’s useful to know the tool, is the possibility to revert the .chm file to a set of separate HTML files. This allows you to publish the help as a web application, or even more important, to make some changes or append extra info to a generated .chm file. More on this below.
When you download the HTML Help Workshop, you can also download the official manual which describes all possibilities in detail, but this post describes the most important things to know to give you a head start.
Create a new project
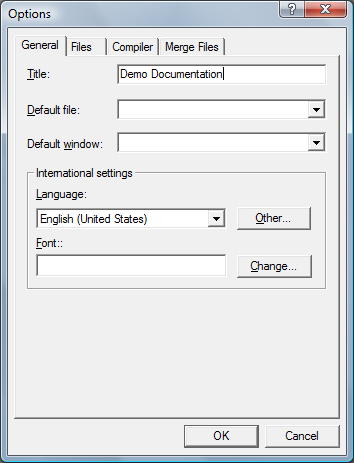
To create your first .chm documentation file, use the menu ‘File’ > ‘New’ > ‘Project’. This will open up a small wizard to get your started. Normally you won’t have any index or content files yet, so you can skip most of the steps. Double click on ‘[OPTIONS]’ to change any properties like the file name and the language. This is also the place where you define the default file to show when opening the documentation. You’ll most likely have to change this (a few times) in the course of creating the documentation when you feel another page is better fit to be the first page.
Adding content, index and search
The next step is adding a content and an index file. This can be done by clicking the ‘Contents’ and ‘Index’ tab in the HTML Help Workshop. These files will store the actual content and index trees (and are not much more than an html unordered list). You can also add an advanced search, which in my opinion is one of the major strengths. I’ll describe this a bit later in this post.
Once the structure template is ready, it’s time to fill it up with the actual documentation. For this you add your content as separate HTML pages in the HTML Help Workshop under the project tab. Adding the files here ensures it shows up in the list when adding a new item in the content tree or a key in the index. You can also add the directly to the content or index tree without adding them to the project first if the list isn’t clear enough (items in the list are shown by the title tag in the HTML file).
The commonly used structure of ‘headings’ (mostly shown as books in .chm files) and topics is clear to most people. But interesting to know is that you can create subentries, or in other words add one or more existing topics to an existing heading (or remove them) by using the left and right arrows in the tool bar. You might get a warning from the application, if it thinks your action is against ’normal logic’, e.g. removing the first topic from a heading by using the left arrow; all subsequent topics on the same level will also be moved up a level together with the first one. The same counts for creating a tree in the index tab.
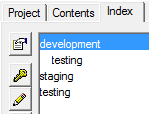
After adding some pages, it’s time to create an index. You can use different approaches to populate this list, but quite often multiple entries for the same page are used. One or more entries (with a different title) reside at the top level, and another entry for the same page is a subentry of a more general topic. This allows the user to search on the topic itself (e.g. testing) or find it under the more general item (e.g. development).
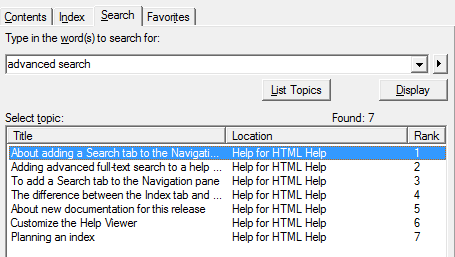
But for better search support you should consider adding the ‘Search’ tab. This search crawls all pages and shows any pages with hits on your search terms. As en extra, it also highlights the searched text in the page itself.
To do this execute following steps:
- Enable full-text search.
- Open a project (.hhp) file, and then click Change Project Options.
- On the Compiler tab, select the Compile full-text search information check box, and then click OK.
- Click Add/Modify Window Definitions, and then click the Navigation Pane tab.
- In the Window type box, click the window you want, and then select the Search tab check box. Select the Advanced check box to add advanced full-text search features.
It might be interesting to define a ‘stop list’ containing the words that you want to omit from the search, such as ’the’ or ‘and’. This will improve the search speed.
Decompile
Very useful is the possibility to decompile an existing .chm file. First of all it gives you a good idea how other people, and even Microsoft, creates their structure for the help documentation. But even better is the possibility this gives you to modify your existing .chm files even if you don’t have the original html structure anymore, or to modify and extend documentation generated by other tools like Sandcastle. You find this functionality under the File > Decompile menu item.
You can find a list of other tools here. If you want to generate documentation/help from your .NET assemblies you should also have a look at Sandcastle. This tool can also generate HTML Help 2.x (.HxS) files.