Introduction
Documenting your API is a very important step in making it usable. You can’t expect a stranger to be able to use your API without knowing what endpoints you’re exposing and which parameters should be used. A stranger includes team members who consume your API method or yourself in a week from now.
This is of course a problem that has been around for decades and every API technology had its own way of documenting, e.g. WSDL files for SOAP services. REST APIs have a few options available, but the majority uses OpenAPI (previously known as Swagger) to document their REST APIs.
Note: documenting your APIs makes it easier for others to use, but it also documents your complete API surface for possible attacks. If you decide to make this documentation public, make sure you have good security and monitoring in place to protect your API.
Open API
When we look at Open API tooling for .NET, the most used options are Swashbuckle and NSwag. A few years ago, you had to do everything yourself, these days Swashbuckle is already included in the Web API template. Let’s look at what the default template scaffolds for us in the Startup class:
    // This method gets called by the runtime. Use this method to add services to the container.
    public void ConfigureServices(IServiceCollection services)
    {
        services.AddControllers();
        services.AddSwaggerGen(c =>
        {
            c.SwaggerDoc("v1", new OpenApiInfo { Title = "BirdAtlas.Api", Version = "v1" });
        });
    }

    // This method gets called by the runtime. Use this method to configure the HTTP request pipeline.
    public void Configure(IApplicationBuilder app, IWebHostEnvironment env)
    {
        if (env.IsDevelopment())
        {
            app.UseDeveloperExceptionPage();
            app.UseSwagger();
            app.UseSwaggerUI(c => c.SwaggerEndpoint("/swagger/v1/swagger.json", "BirdAtlas.Api v1"));
        }

        ...
    }
In the ConfigureServices method there is the AddSwaggerGen method that adds the required infrastructure to generate an OpenApi JSON file based on the methods in your codebase. In the Configure method we tell the system to use this generated output and show a Swagger UI to visualize the JSON file.
Starting up your API project, will redirect you to the documentation page of your API at https://localhost:44398/swagger/index.html (port may vary depending on your launchSettings.json file).
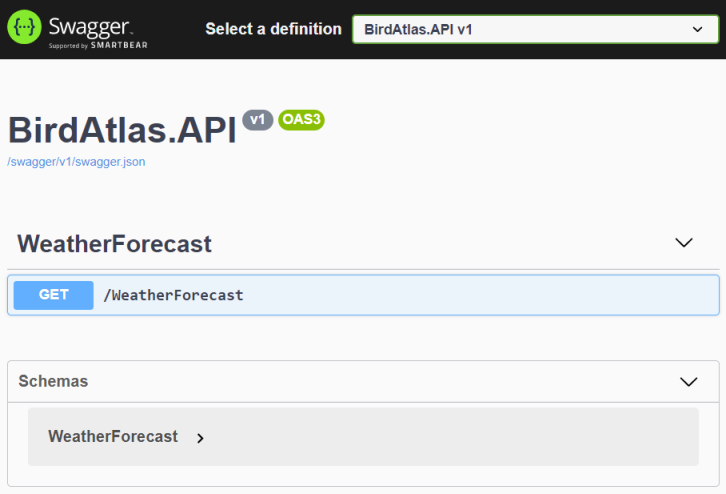
When you open up the GET /WeatherForecast method by clicking on it, you can hit the Try it out button and do an actual API call. If you had a breakpoint set in the controller’s methods, it would get hit. As we don’t have unit/integration tests set up yet, nor another (semi-)automated test solution like Postman, this is an easy way to start debugging our API.
One of the first things I usually do (certainly for a dev environment) is expose the documentation page on the root URL by setting the RoutePrefix property. This way a consumer doesn’t have to try and find the documentation url as on a deployed environment (on-premises or in e.g. Azure) the auto-redirect typically isn’t in place. Depending on the API, I often allow the documentation to be served on all environments instead of only the development environment (see note above on security). To enable these changes, I modify the code to this by moving the Swagger calls outside of the IsDevelopment check.
    // This method gets called by the runtime. Use this method to configure the HTTP request pipeline.
    public void Configure(IApplicationBuilder app, IWebHostEnvironment env)
    {
        if (env.IsDevelopment())
        {
            app.UseDeveloperExceptionPage();
        }

        app.UseSwagger();
        app.UseSwaggerUI(c =>
        {
            c.SwaggerEndpoint("/swagger/v1/swagger.json", "BirdAtlas.Api v1");
            c.RoutePrefix = string.Empty;
        });

        ...
    }
Once you have done this, you will also have to update the launchSettings.json file to no longer redirect to /swagger but simply go to the root url. This is done by clearing the launchUrl property.
{
  ...
  "profiles": {
    "IIS Express": {
      "commandName": "IISExpress",
      "launchBrowser": true,
      "launchUrl": "",
      "environmentVariables": {
        "ASPNETCORE_ENVIRONMENT": "Development"
      }
    },
    ...
  }
}
Adding documentation
While having an overview of the available API methods is a good start, we can be a lot more descriptive by adding extra comments on the API methods and models. Under Links you can find a download with more models and controllers for your project, but you can continue on your own codebase as well.
XML Documentation
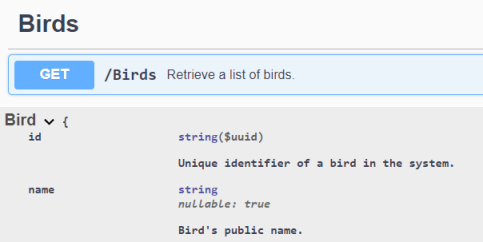
The very first thing you can do is add XML comments to all controller methods and model properties by hitting triple forward slash. This will add a comment block with extra tags for e.g. summary and parameters. Most teams already do this for their public methods on their classes as this helps for IntelliSense as well.
    /// <summary>
    /// Retrieve a list of birds.
    /// </summary>
    /// <param name="page">Page count</param>
    /// <param name="amount">Amount of birds per page</param>
    /// <returns>A collection of <see cref="Bird"/> objects.</returns>
    [HttpGet]
    public IEnumerable<Bird> List(int page = 0, int amount = 20)
But simply adding these XML documentation comments in code is not enough. We have to tell the OpenAPI (Swagger) generator to use these comments.
The first step is generating an XML documentation file. You can go through the project properties window (right- click on project and choose Properties), then pick the Build blade and scroll down to check the XML documentation file near the bottom. This will however generate a file with an absolute path and only for the build profile that was selected. You will have to make this path relative to make sure it works on all devices, including a build server. Easier is to simply edit the csproj file itself and add following code, then build your project to verify the file gets generated:
  <PropertyGroup>
    <GenerateDocumentationFile>true</GenerateDocumentationFile>
    <NoWarn>$(NoWarn);1591</NoWarn>
  </PropertyGroup>
Note: Don’t forget to add this generated XML file to your .gitignore file so you don’t have to commit it on every single API method, model or documentation change. This is a file that is rebuild automatically similar to your binaries.
The second part modifying the configuration in your Startup class to tell SwaggerUI to use this file. I typically use a bit of code to create the filename instead of hardcoding the filename in a string. This both makes reusable code, and allows to further refactor this into loading multiple documentation files for multiple assemblies (which should all have their build output copied to the API project).
    services.AddSwaggerGen(c =>
    {
        c.SwaggerDoc("v1", new OpenApiInfo { Title = "BirdAtlas.Api", Version = "v1" });

        // Set the comments path for the Swagger JSON and UI.
        var xmlFile = $"{Assembly.GetExecutingAssembly().GetName().Name}.xml";
        var xmlPath = Path.Combine(AppContext.BaseDirectory, xmlFile);
        c.IncludeXmlComments(xmlPath);
    });
Model metadata
When defining models for your API, each property has its own type and maybe specific formatting. You typically also have certain fields that are required or should have values within a given range. Being able to expose this metadata in your API documentation is very useful for the API consumers, otherwise they’ll need a lot of trial and error.
The System.Components.DataAnnotations namespace has a series of attributes to help you define the metadata of your properties. As an added benefit, the same attributes are used by Entity Framework (Core) to define the model on top of SQL server. This means that your team most likely knows this already. These data annotations can also be used as validation, if you’re trying to submit a model with an empty required field, you will get a 400 Bad Request as result. An example of some data annotations:
    /// <summary>
    /// Model with required properties to create a new bird registration.
    /// </summary>
    public class CreateBirdCommand
    {
        /// <summary>
        /// Bird's binomial name.
        /// </summary>
        [Required]
        [MaxLength(50)]
        public string Binomial { get; set; }

        /// <summary>
        /// Bird's habitat.
        /// </summary>
        [Required]
        public HabitatType Habitat { get; set; }

        ...
    }
Add some data annotations, run your API and verify in the models down below that these fields now are required. Try to execute an API call (creating a bird) with leaving a required field empty. You should receive a 400 Bad Request. This is thanks to the ASP.NET Core automatic model binding and model validation, no extra work is required. You can read more on model validation on the official docs.
Note: It is not because data annotations can be used for both database and API models that you should reuse those models. It’s a good practice to not expose your internal storage models to the outer world, but provide ‘DTO’ models which know nothing about how you store your data and possibly change quite a bit because they serve another purpose (e.g. data for a UI screen).
Enums
Enums are special types in C#, they force you to use a limited set of option while giving you a strong-typed coding experience (instead of e.g. simple integer values). Out of the box, these enumerations will get serialized as integer values in your API models, meaning that you loose any information on their actual values. You can verify this on your API in SwaggerUI; scroll down to the Habitat model and open the enum values. You’ll notice this is a range of integers.
A much better option would be to able to use the string representation of this enum so the consumer can safely use any value, without having to know what a ‘2’ means, or without us breaking their application if we decide to change the internal numeric representation. This can be done by simply adding a JsonStringEnumConverter (System.Text.Json.Serialization) in our configuration in the Startup class. This will result in following array of values being valid API model values: [ Forest, Grassland, Tundra, Desert, Wetland, Ocean, UrbanSuburban ].
    services
        .AddControllers()
        .AddJsonOptions(opts =>
        {
            var enumConverter = new JsonStringEnumConverter();
            opts.JsonSerializerOptions.Converters.Add(enumConverter);
        });
API method response types
We’ve added comments on both the API methods and models to describe their usage. Now we go one step further and define all the possible HTTP responses that method can return, including the actual response models. By default, ASP.NET Core Web API already does a decent job to document this by trying to find out the possible paths in your controller method and check which types you do return.
In the API method above, we return an IEnumerable<Bird> so the system knows we’re returning an array of Bird objects and will document as such in the OpenAPI specification (and thus show in SwaggerUI). Note that we’re returning a synchronous call here, so don’t use this with e.g. asynchronous database access to not starve your API.
For a collection, this might be good enough. When fetching a single item, you might return a Bird object, but also a 404 Not Found when there’s no object for the given id. So setting the return type to Bird no longer is a valid option. Similar for a POST or PUT method which might return a 400 Bad Request. For that reason we’ll switch out the explicit type for an ActionResult/IActionResult which opens up the responses. Because of that, we now need to tell the OpenAPI generator what we’ll return, this is done by using a ProducesResponseType attribute. More information can be found on the official documentation page of action return types. This results in following code:
    /// <summary>
    /// Get a single bird
    /// </summary>
    /// <param name="id">Id</param>
    /// <returns>A bird if found</returns>
    [ProducesResponseType(StatusCodes.Status200OK, Type = typeof(Bird))]
    [ProducesResponseType(StatusCodes.Status404NotFound)]
    [HttpGet("{id}")]
    public IActionResult<Bird> Get(Guid id)
    {
        var bird = BirdData.Birds.SingleOrDefault(b => b.Id == id);
        if (bird == null)
            return NotFound();

        return bird;
    }

    /// <summary>
    /// Register a new bird
    /// </summary>
    /// <param name="createBirdCommand">Required properties of a bird</param>
    /// <returns>Bird object and location where to find the bird</returns>
    [ProducesResponseType(StatusCodes.Status201Created, Type = typeof(Bird))]
    [ProducesResponseType(StatusCodes.Status401Unauthorized)]
    [ProducesResponseType(StatusCodes.Status403Forbidden)]
    [ProducesResponseType(StatusCodes.Status400BadRequest)]
    [HttpPost]
    public IActionResult Create([FromBody] CreateBirdCommand createBirdCommand)
    {
        Bird newBird = new Bird { Id = Guid.NewGuid() }; // TODO map + insert
        return CreatedAtAction(nameof(Get), new { id = newBird.Id }, newBird);
    }

    /// <summary>
    /// Update the properties of a bird
    /// </summary>
    /// <param name="id">Bird's id</param>
    /// <param name="bird">Complete bird object, no PATCH is supported.</param>
    /// <returns></returns>
    [ProducesResponseType(StatusCodes.Status200OK)]
    [ProducesResponseType(StatusCodes.Status401Unauthorized)]
    [ProducesResponseType(StatusCodes.Status403Forbidden)]
    [ProducesResponseType(StatusCodes.Status400BadRequest)]
    [HttpPut("{id}")]
    public IActionResult Update(Guid id, [FromBody] Bird bird)
    {
        return Ok();
    }
Note: I have already added 403 Forbidden responses, but we’ll handle security in another blog post.
With these additions, we now have an OpenAPI specification and a SwaggerUI page with extensive documentation of our API. Run your API and verify on the different endpoints that it shows multiple possible API responses.
Links
Some extra models and controllers for this step can be downloaded here. Simply copy over the three folders under ‘02 OpenAPI’ into your project.
Disclaimer and code
Technology is always evolving. Most of the concepts in this blog series will be applicable in future releases of .NET, although actual code might change. Throughout the blog posts I’m linking to as much official documentation as possible, as this is updated by the product teams on a regular basis.
Code for this blog series is available at https://github.com/SanITy-BV/BirdAtlas-backend. We try to keep the repository updated with new principles and newer .NET versions as it is our primary tool for demoing. Code might change slightly from what is described in the blog post, this both because of simplification for the reader of this post and possible future updates in the codebase. Always review the code before using in production software. Please reach out if you’re having issues with following the blog post because of these possible changes.