Introduction
In the previous posts we used Azure Active Directory for authentication and authorization on our API. However, having secured our API we’re no longer able to use the SwaggerUI to test since we’re now required to pass in a correct JWT bearer token.
You could try to capture a valid token from your frontend doing API calls or maybe create e.g. a Postman call to log in and retrieve your token, but it can be a lot easier.
Making authenticated calls from SwaggerUI
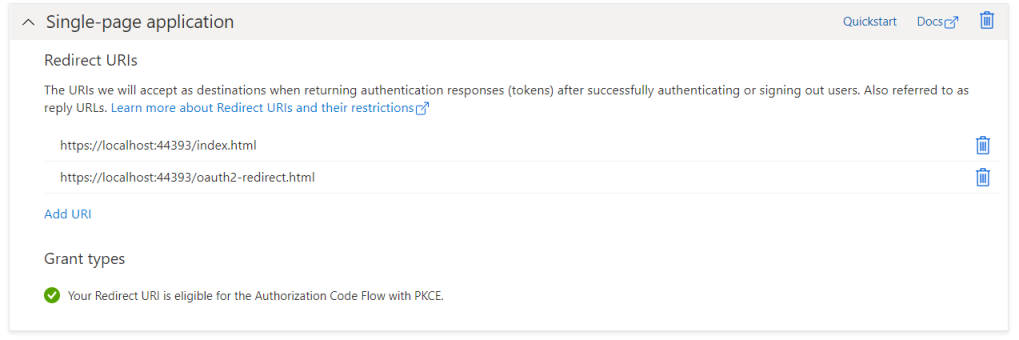
SwaggerUI is a client of our API as any other website. We have created a web client app registration with following redirect URIs in the portal before:
Add the below json snippet in the root of your appsettings.json file. Use the app registration id as OpenIdClientId property, copy over the correct ApiScope value. The GUID in both AuthorizationUrl and TokenUrl is your tenant id. We could have added below properties to config section, but for simplicity we’ll just use them as straight properties for now.
{
  "AzureAd": {
    "Instance": "https://login.microsoftonline.com/",
    "Domain": "birdatlas.onmicrosoft.com",
    "TenantId": "<your-tentant-id>",
    "ClientId": "<your-api-app-client-id>"
  },
  ...

  "AuthorizationUrl": "https://login.microsoftonline.com/<your-tentant-id>/oauth2/v2.0/authorize",
  "TokenUrl": "https://login.microsoftonline.com/<your-tentant-id>/oauth2/v2.0/token",
  "ApiScope": "api://<your-api-app-client-id>/api.read",
  "OpenIdClientId": "<your-swagger-app-client-id>"
}
In the SwaggerExtensions class (in our samples codebase, or Startup class if you did not refactor), expand the AddSwaggerGen method by adding the AddSecurityDefinition and AddSecurityRequirement methods. We use the four properties from the appsettings by using the IConfiguration object which can be accessed as a dictionary.
    services.AddSwaggerGen(
        options =>
        {
            // integrate xml comments
            foreach (var type in typesForDocumentation)
            {
                options.IncludeXmlComments(GetXmlCommentsFilePath(type));
            }

            options.AddSecurityDefinition("oauth2", new OpenApiSecurityScheme
            {
                Description = "OAuth2.0 Auth Code with PKCE",
                Name = "oauth2",
                Type = SecuritySchemeType.OAuth2,
                Flows = new OpenApiOAuthFlows
                {
                    AuthorizationCode = new OpenApiOAuthFlow
                    {
                        AuthorizationUrl = new Uri(configuration["AuthorizationUrl"]),
                        TokenUrl = new Uri(configuration["TokenUrl"]),
                        Scopes = new Dictionary<string, string>
                        {
                            { configuration["ApiScope"], "read the api" }
                        }
                    }
                }
            });
            options.AddSecurityRequirement(new OpenApiSecurityRequirement
            {
                {
                    new OpenApiSecurityScheme
                    {
                        Reference = new OpenApiReference { Type = ReferenceType.SecurityScheme, Id = "oauth2" }
                    },
                    new[] { configuration["ApiScope"] }
                }
            });
        });
On the second method in this class also add IConfiguration as a parameter and add the three OAuth related method calls to add an Authorize button with login functionality to SwaggerUI.
    public static IApplicationBuilder AddVersionedSwaggerRegistration(this IApplicationBuilder app, IApiVersionDescriptionProvider provider,
        IConfiguration configuration, string swaggerRoutePrefix = "")
    {
        app.UseSwagger();
        app.UseSwaggerUI(
            options =>
            {
                // build a swagger endpoint for each discovered API version
                foreach (var description in provider.ApiVersionDescriptions)
                {
                    options.SwaggerEndpoint($"/swagger/{description.GroupName}/swagger.json", description.GroupName.ToUpperInvariant());
                    options.RoutePrefix = swaggerRoutePrefix;
                }

                options.OAuthClientId(configuration["OpenIdClientId"]);
                options.OAuthUsePkce();
                options.OAuthScopeSeparator(" ");
            });

        return app;
    }
Don’t forget to update the Configure method in the Startup class to inject our configuration.
app.AddVersionedSwaggerRegistration(provider, Configuration);
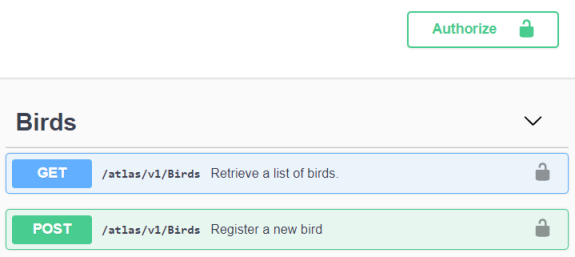
When you run the code, you should see the Authorize button show up.
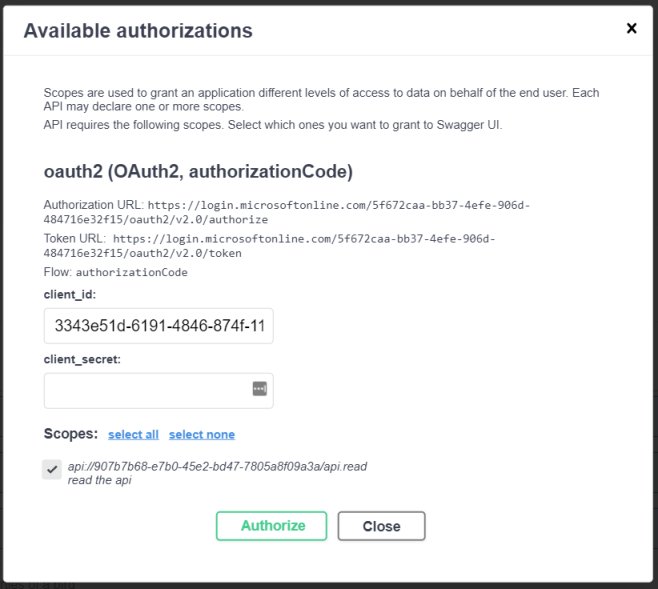
Hitting the button gives us a popup where we can start the authentication flow. Client id is already filled in through the appsettings. Client secret is left empty and since we’re using PKCE we don’t have to fill it in. Make sure to check the required scope and hit Authorize. You’ll go through the well known Azure Active Directory login.
Once you’re logged in, you can execute API calls through SwaggerUI again even those requiring authentication. If you execute a call, you’ll see your bearer token behind Authorization: Bearer in the curl window.
curl -X POST "https://localhost:44393/atlas/v1/Birds" -H  "accept: text/plain"
-H  "Authorization: Bearer eyJ0eXA...PvKQ"
-H  "Content-Type: application/json" -d "{\"binomial\":\"string\",\"habitat\":\"Forest\",\"diet\":\"string\",\"nesting\":\"string\",\"population\":\"string\",\"imageUrl\":\"string\"}"
Copy the full encoded string and decode it on jwt.ms. Part of the decoded token shows us the client id and our scope and roles.
  "appid": "<your-swagger-app-client-id>",
  ...
  "roles": [
    "BirdAtlas.API.Users",
    "BirdAtlas.API.Admins"
  ],
  "scp": "api.read",
  ...
Disclaimer and code
Technology is always evolving. Most of the concepts in this blog series will be applicable in future releases of .NET, although actual code might change. Throughout the blog posts I’m linking to as much official documentation as possible, as this is updated by the product teams on a regular basis.
Code for this blog series is available at https://github.com/SanITy-BV/BirdAtlas-backend. We try to keep the repository updated with new principles and newer .NET versions as it is our primary tool for demoing. Code might change slightly from what is described in the blog post, this both because of simplification for the reader of this post and possible future updates in the codebase. Always review the code before using in production software. Please reach out if you’re having issues with following the blog post because of these possible changes.