You will typically need some sort of authorization/authentication when you are building an enterprise application. After all you don’t want just anyone to read or modify your data, but most likely you will also have multiple roles within your organization or application. A typical example here is an administrator role who can modify master data (e.g. dropdown list values), a regular user that can input data and a reviewer or process owner that approves requests.
Terminology
Before we jump into securing our API, lets first go through some security terminology so we’re all on the same page.
The very basics are:
- Authentication: the process of verifying who someone is. This is typically done with a proof of identity like e.g. username-password combination or a government e-id.
- Authorization: the process of verifying to which resources (application, files, data, …) an authenticated principal has access to.
Next to these basics we need a few more items:
- Principal: an entity that can be authenticated. This can be a user but also a system entity.
- Identity Provider (IdP): a system that creates, maintains, and manages identity information for principals and provides authentication services to relying applications within a federation or distributed network.
- Relying Party (RP): a web site or application that wants to verify the end user’s identifier.
- Secure Token Service (STS): broker that sits between user and relying party. Can be configured as IdP or as a federation provider in front of multiple IdPs.
Using Azure Active Directory
With the terminology covered, let’s dive into technology. There are several options for having a STS (or IdP), but since we’re deploying our API to Microsoft Azure we’ll be using Azure Active Directory in our solution.
Consuming a secured API
Full disclosure: I’m no frontend (web) developer, so the last thing you’ll see me do in my limited spare time is trying to create a SPA in any of the fancy JavaScript-based framework of the day. There are plenty of great resources out there and the Angular website in our samples is based on this great tutorial.
What I do want to help you with is pointing out what you have to do in Azure Active Directory and which libraries you can use. The latter one is very simple: for almost any mainstream frontend language/framework, you can use the MSAL packages provided by Microsoft. You can read the complete list of benefits for using that library, but in short: it does all the heavy lifting with tokens (retrieving, caching, refreshing, …) based on simple configuration. There’s no reason to not use it and roll your own framework (when using one of these platforms).
Registering a client in Azure Active Directory
I could rewrite the existing documentation, but since Microsoft does put great effort into writing clear documentation I’ll simply link on how to register your applications (both frontend and API) in Azure Active Directory.
Add Authentication to our API
The first thing we’ll do is add authentication on the API so we’re only exposing our endpoints to authenticated users.
Since we’re adding new functionality to our API, we’ll need some new NuGet packages again:
    <PackageReference Include="Microsoft.AspNetCore.Authentication.JwtBearer" Version="5.0.8" />
    <PackageReference Include="Microsoft.AspNetCore.Authentication.OpenIdConnect" Version="5.0.8" />
    <PackageReference Include="Microsoft.Identity.Web" Version="1.1.0" />
Microsoft.Identity.Web brings a lot of functionality to the table and turns something complex like security into a few lines of code. But let’s first put the required ids in the appsettings.json file before changing any code. We need following four properties and by using these exact property names, Microsoft.Identity.Web can read the section directly from config.
{
"AzureAd": {
"Instance": "https://login.microsoftonline.com/",
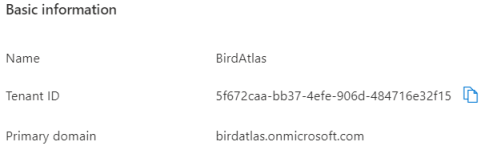
"Domain": "birdatlas.onmicrosoft.com",
"TenantId": "<your-tentant-id>",
"ClientId": "<your-api-app-client-id>"
},
...
}
Since we’re using Azure Active Directory (AAD), the instance is already correct. Update the domain name and both tenant id and client id (of your API app registration) with the values you can find in the Azure portal.
Now, let’s use these parameters to get authentication configured in our Startup class. First add following two lines of code on top in the ConfigureServices method. With this code we read the section named AzureAd that we just added to the appsettings and we use Jwt Bearer tokens as the authentication scheme for the OpenID Connect tokens retrieved from AAD.
        public void ConfigureServices(IServiceCollection services)
        {
            // Add AAD security
            services.AddAuthentication(JwtBearerDefaults.AuthenticationScheme)
                .AddMicrosoftIdentityWebApi(Configuration.GetSection("AzureAd"));

            services
                .AddControllers()
            ...
In the Configure method we already had the UseAuthorization method and we simply add UseAuthentication as well.
    app.UseAuthentication();
    app.UseAuthorization();
With this, the wiring is done and security just works. All that is left to do is define which resources should be protected by adding the Authorize attribute on top of controllers or methods. For our birds API we only want to limit access to resources that write data back to our backend. Below an example of how to use the attribute.
    /// <summary>
    /// Register a new bird
    /// </summary>
    /// <param name="createBirdCommand">Required properties of a bird</param>
    /// <returns>Bird object and location where to find the bird</returns>
    [Authorize]
    [ProducesResponseType(StatusCodes.Status201Created, Type = typeof(Bird))]
    [ProducesResponseType(StatusCodes.Status401Unauthorized)]
    [ProducesResponseType(StatusCodes.Status403Forbidden)]
    [ProducesResponseType(StatusCodes.Status400BadRequest)]
    [HttpPost]
    public IActionResult Create([FromBody] CreateBirdCommand createBirdCommand)
    {
        Bird newBird = new Bird {Id = Guid.NewGuid()}; // TODO map + insert
        return CreatedAtAction(nameof(Get), new {id = newBird.Id}, newBird);
    }
Wrap-up
In this post we have used Azure Active Directory to force authentication on our API. In the next post we’ll go a step further and verify the access of our logged-in user.
Links
Disclaimer and code
Technology is always evolving. Most of the concepts in this blog series will be applicable in future releases of .NET, although actual code might change. Throughout the blog posts I’m linking to as much official documentation as possible, as this is updated by the product teams on a regular basis.
Code for this blog series is available at https://github.com/SanITy-BV/BirdAtlas-backend. We try to keep the repository updated with new principles and newer .NET versions as it is our primary tool for demoing. Code might change slightly from what is described in the blog post, this both because of simplification for the reader of this post and possible future updates in the codebase. Always review the code before using in production software. Please reach out if you’re having issues with following the blog post because of these possible changes.